Install_cyberpanel_wordpress_ubuntu_18
How to Install CyberPanel and Set Up a WordPress Blog on Ubuntu 18.04
Introduction
In this guide, we’ll focus on implementing a blazing-fast WordPress site in two parts: First, we’ll install CyberPanel and associated software (OpenLiteSpeed, MariaDB, ACME Client, Pure-FTPd, PowerDNS, phpMyAdmin, Rainloop, and PHP). Then, we’ll set up SSL and get your WordPress site up and running.
Once you have completed all of the steps in this guide, not only will you have a speedy WordPress site of your own, but you will be prepared to provide personal hosting services for multiple users, if you wish.
Prerequisites
In order to complete this tutorial, you will need access to a Ubuntu 18.04 server. You can use a Digital Ocean droplet for this, although it is not required.
Requirements
You will also need the following before you can begin this guide:
- root user: The installation must be run as root (sudo will not work).
- A registered domain for TLS/SSL security: The easiest way to secure your site is with Let’s Encrypt, which provides free, trusted certificates. CyberPanel will handle this part for you, so all we really need to do is update your registered domain name records to point to your new server. If you do not have a domain, and you are just using this configuration for testing or personal purposes, you can use a self-signed certificate instead.
Once you have a registered domain with the records pointing to your new server, log into the server as the root user and continue below.
Step 1 - Installing CyberPanel
We will be installing CyberPanel using the CyberPanel installer, which includes all of the necessary packages: web server, multiple PHP versions, database, firewall, etc.
CyberPanel can be installed with a single command and should be installed within 15 minutes depending on the server specifications.
Note: If you’re using DigitalOcean, you can use the one-click app found in the Marketplace to launch CyberPanel on Ubuntu 18.04 system in 3 minutes.
Log into the server via SSH.
Run the following commands to download and exectute the latest version of the CyberPanel installer from the root directory:
cd ~ && sh <(curl https://cyberpanel.net/install.sh || wget -O - https://cyberpanel.net/install.sh)
You should see the following output from the interactive script:
[secondary_label Output]
Process check completed...

    CyberPanel Installer v2.0

  1. Install CyberPanel.

  2. Install Addons.

  3. Exit.

Please enter the number[1-3]:
Type 1 and press ENTER.
You will see the following menu:
[secondary_label Output]
  RAM check : 77/985MB (7.82%)

  Disk check : 987/25GB (5%) (Minimal 10GB free space)

  1. Install CyberPanel with OpenLiteSpeed.

  2. Install Cyberpanel with LiteSpeed Enterprise.

  3. Exit.


Please enter the number[1-3]:
Type 1 and press ENTER.
You will be asked to set a password:
[secondary_label Output]
Please choose to use default admin password 1234567, randomly generate one (recommended) or specify the admin password?
Choose [d]fault, [r]andom or [s]et password: [d/r/s]
Type r to generate a random password and press ENTER.
The installer will now prompt you to choose an object cache service:
[secondary_label Output]
Install LiteSpeed Memcached?
Please select [y/N]: y

Install Redis?
Please select [y/N]: y
Select y to install the service.
Within a few minutes, the CyberPanel control panel and extensions will be installed, and your administrator details will be displayed:
[secondary_label Output]
###################################################################
                CyberPanel Successfully Installed

                Current Disk usage : 3/25GB (15%)

                Current RAM  usage : 238/985MB (24.16%)

                Installation time  : 0 hrs 11 min 12 sec

                Visit: https://1.2.3.4:8090
                Panel username: admin
                Panel password: RANDOMPASSWORD

            Please change your default admin password
          If you need to reset your panel password, please run:
                adminPass YOUR_NEW_PASSWORD

          If you change mysql password, please  modify file in
         /etc/cyberpanel/mysqlPassword with new password as well

              Website : https://www.cyberpanel.net
              Forums  : https://forums.cyberpanel.net
              Wikipage: https://docs.cyberpanel.net

            Enjoy your accelerated Internet by
                CyberPanel & OpenLiteSpeed
###################################################################
Digital Ocean detected...
This provider has a network-level firewall
Please make sure you have opened following port for both in/out:
TCP: 8090 for CyberPanel
TCP: 80, TCP: 443 and UDP: 443 for webserver
TCP: 21 and TCP: 40110-40210 for FTP
TCP: 25, TCP: 587, TCP: 465, TCP: 110, TCP: 143 and TCP: 993 for mail service
TCP: 53 and UDP: 53 for DNS service
Would you like to restart your server now? [Y/n]:
Type Y and press Enter to restart the server and apply system configuration.
Note: If you have a network-layer firewall applied, please make sure you have the firewall opened with the following ports for both inbound and outbound rules: TCP: 21 25 53 80 110 143 443 465 587 993 8090 40110-40210 UDP: 53 443
Step 2 - Logging into the Control Panel
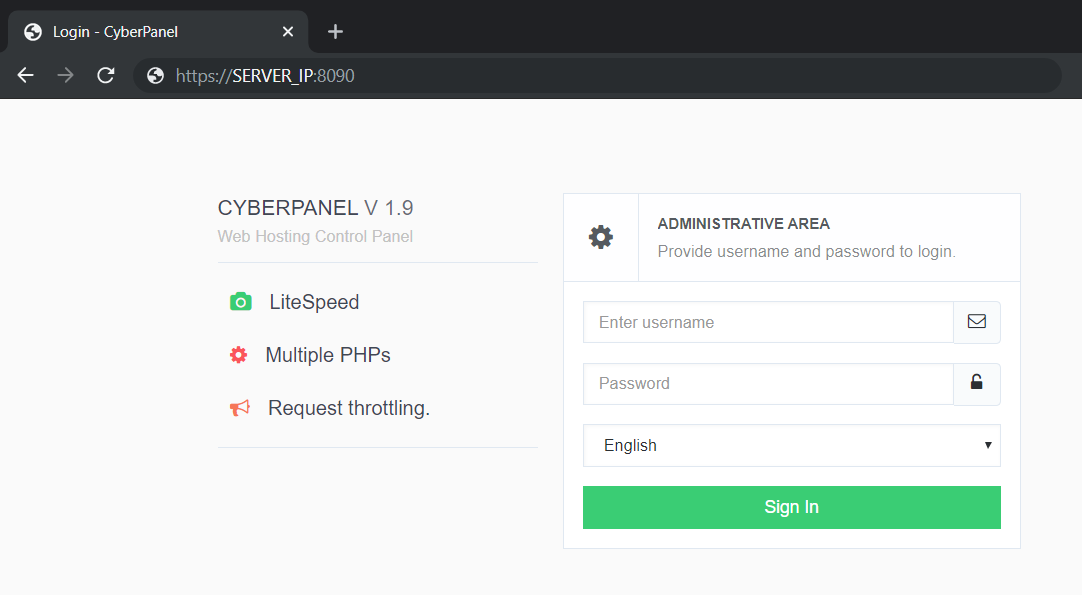
Visit your server’s IP address at the CyberPanel port: YOUR_SERVER_IP:8090. You will see a login page. Enter admin for the Username and RANDOMPASSWORD for the Password. The default language is English, but you can choose a different one if you wish.
Note: It’s normal to see a “Not secure” message in the browser when visiting a website with a self-signed certificate. To get ride of the warning, you can issue a valid SSL certificate.
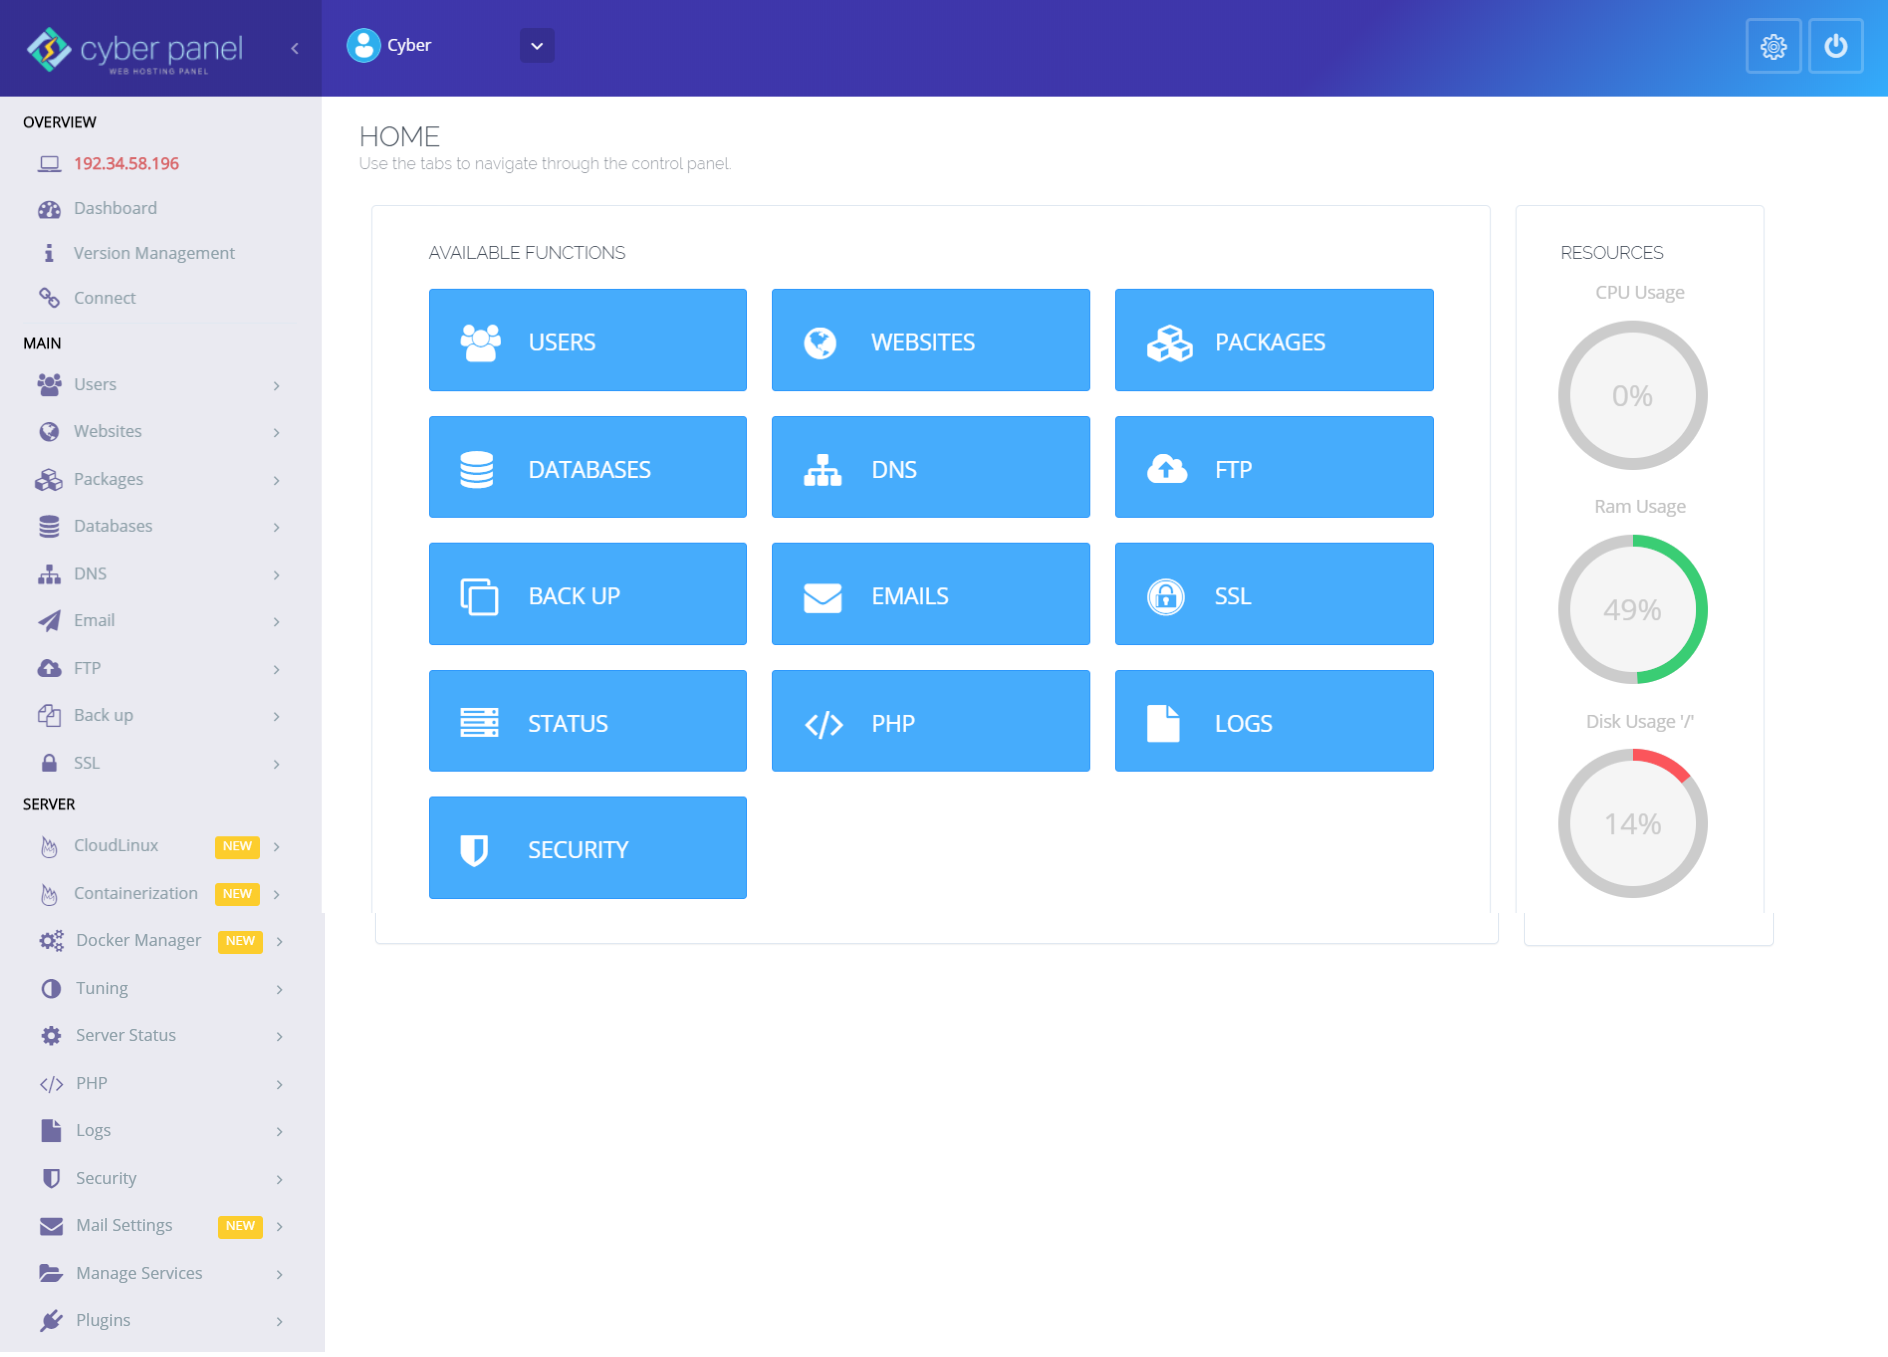
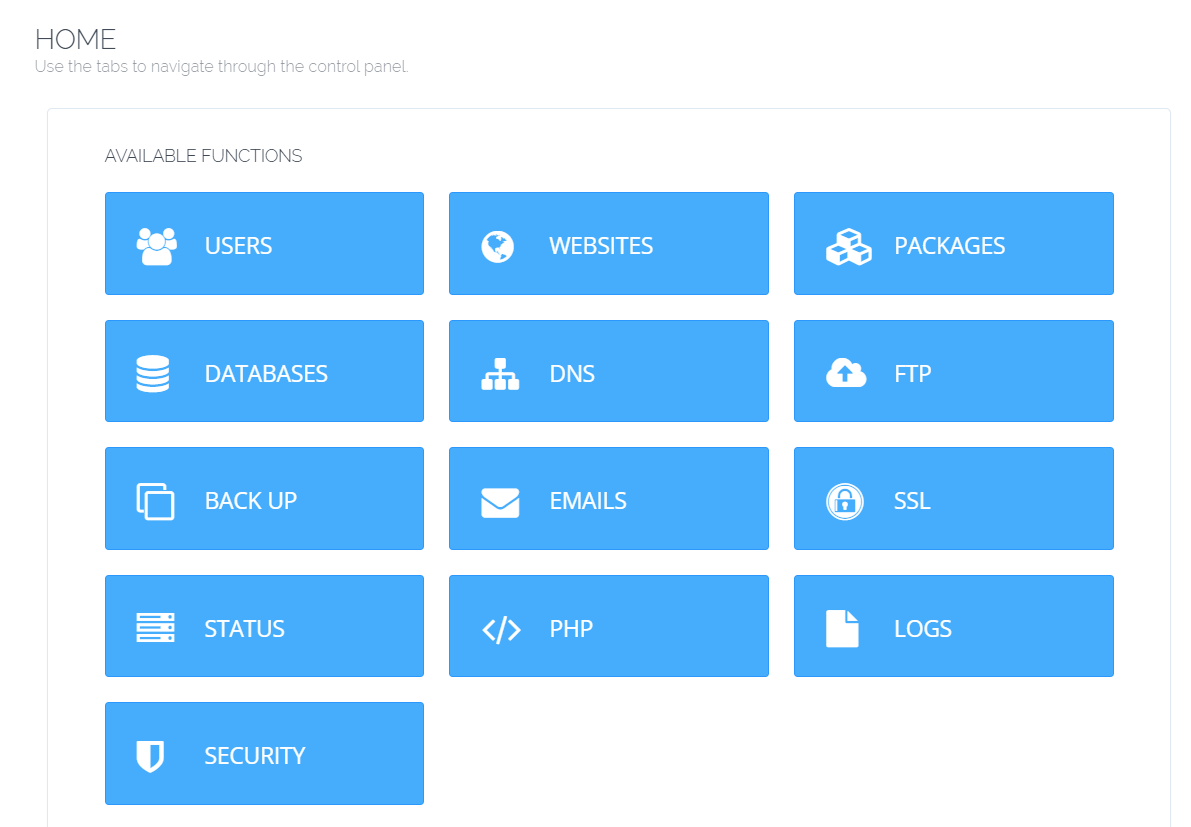
This is your CyberPanel HOME page. Along the left side is the menu, which includes all of the functions for server, admin, reseller, and user. The large middle area is for often-used functions, and the section to the right shows the current status of server resources.
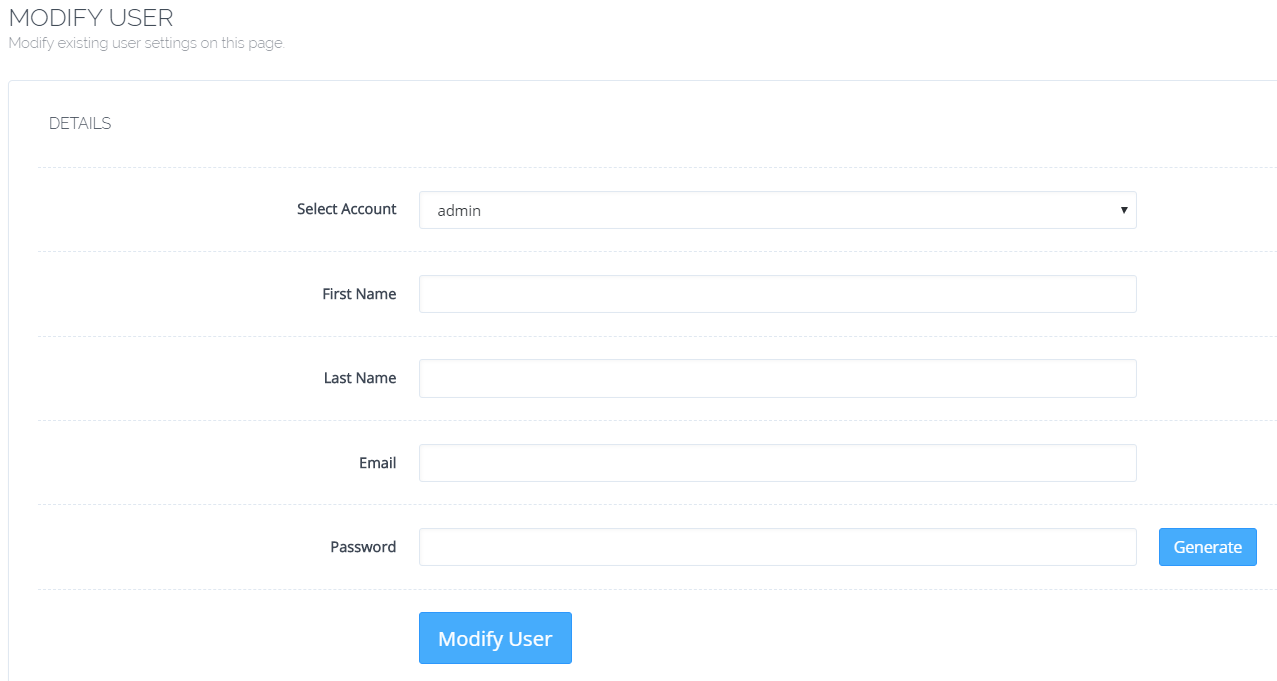
We recommend you update the user profile during your first visit. Click USERS > MODIFY USER, and select the admin account from the Select Account dropdown menu. Update First Name, Last Name, Email and Password, as desired. Once complete, click the Modify User button.
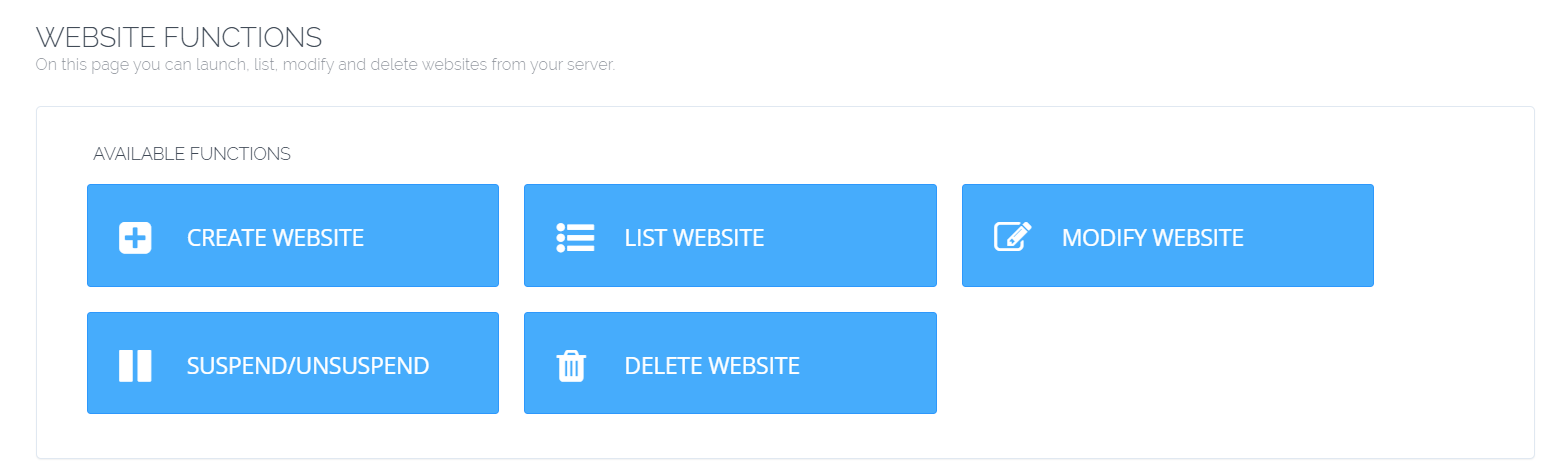
Step 3 - Creating Your First Website Over TLS/SSL
Click the WEBSITES button in the center of the HOME page.
Click the CREATE WEBSITE button.
Do you have a valid domain and wish to apply a Let’s Encrypt certificate? Follow the steps in Step 3 Option One. If you are testing, or wish to use a custom or self-signed certificate, scroll down and follow the steps in Step 3 Option Two
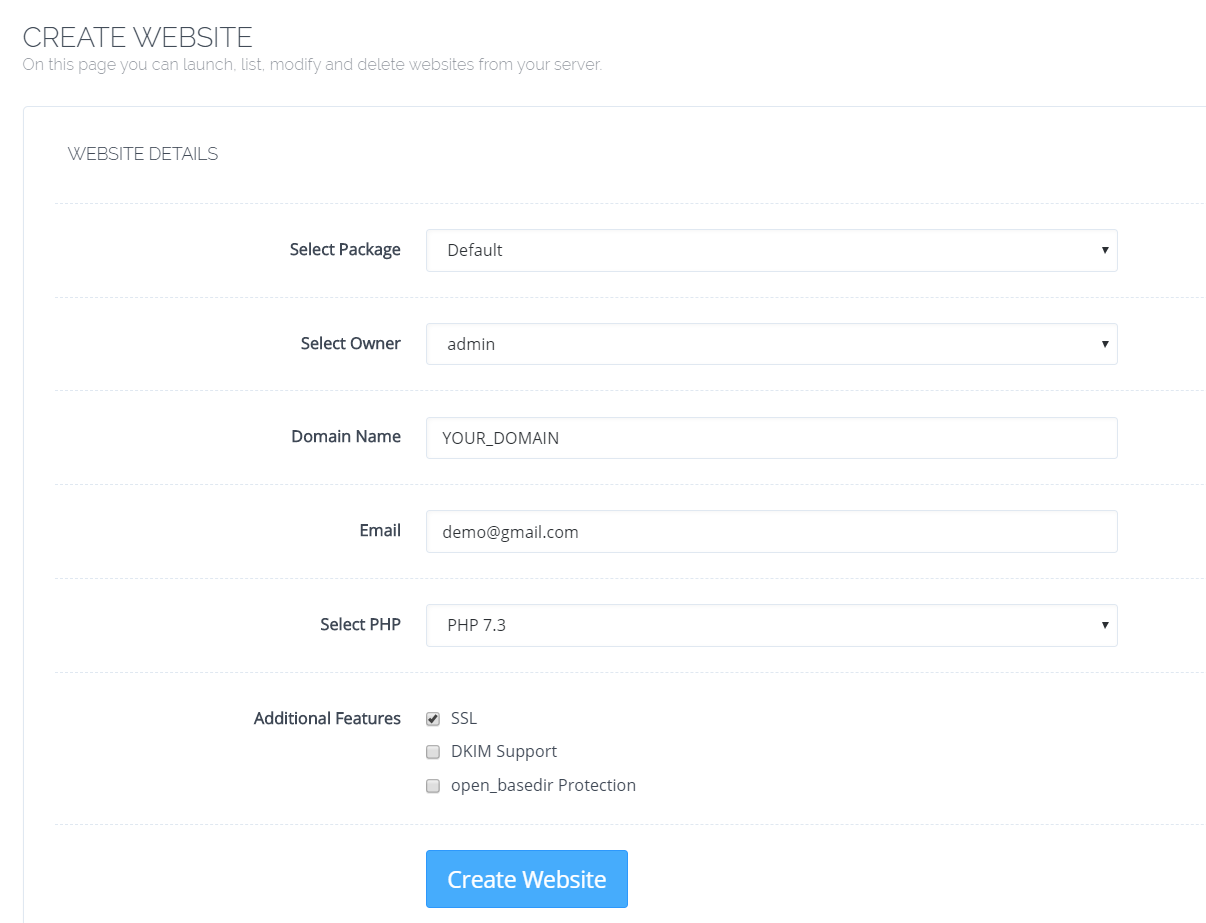
Step 3 Option One: Let’s Encrypt Certificate
Input the following values to set up your first site:
- Select Package
Default - Select Owner:
admin - Domain Name: YOUR_DOMAIN
- Email: demo@gmail.com
- Select PHP: PHP7.3
- Additional Features:
- SSL: Select. This will automatically apply SSL via Let’s Encrypt.
- DKIM: DKIM is an Internet Standard that enables a person or organization to associate a domain name with an email message. We can leave it unselected.
- open_basedir Protection: open_basedir can be used to limit the files that can be accessed by PHP to the specified directory-tree, including the file itself. We can leave it unselected.
Press the Create Website button to create the website.
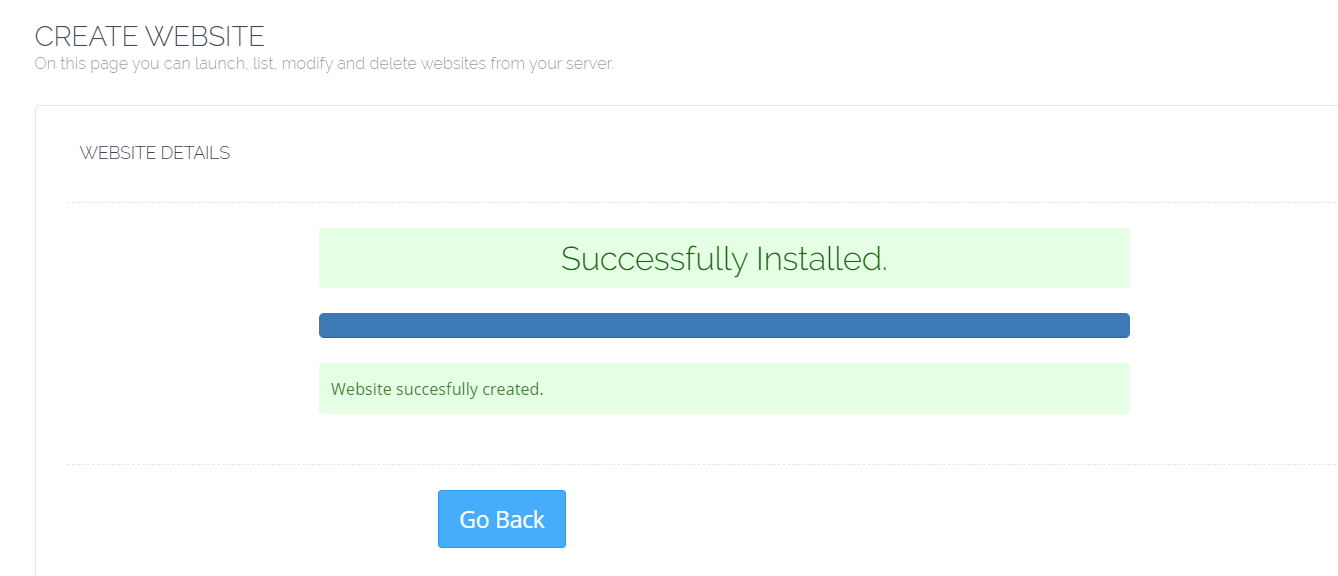
When the website creation completes successfully, you will see the following success message:
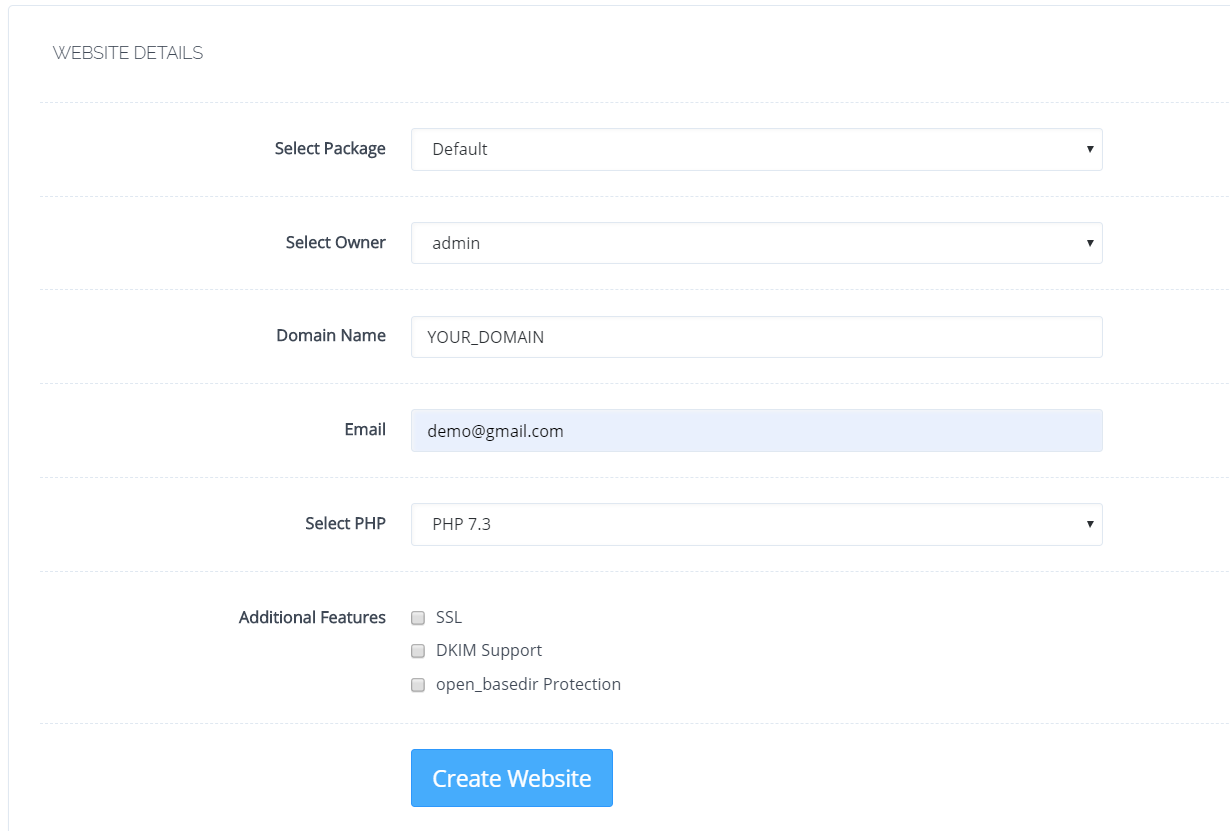
Step 3 Option Two: Custom Certificate
Input the following values to set up your first site:
- Select Package
Default - Select Owner:
admin - Domain Name: YOUR_DOMAIN
- Email: demo@gmail.com
- Select PHP: PHP7.3
- Additional Features:
- SSL: Leave unselected.
- DKIM: DKIM is an Internet Standard that enables a person or organization to associate a domain name with an email message. We can leave it unselected.
- open_basedir Protection: open_basedir can be used to limit the files that can be accessed by PHP to the specified directory-tree, including the file itself. We can leave it unselected.
Press the Create Website button to create the website.
When the website creation completes successfully, you will see the following success message:
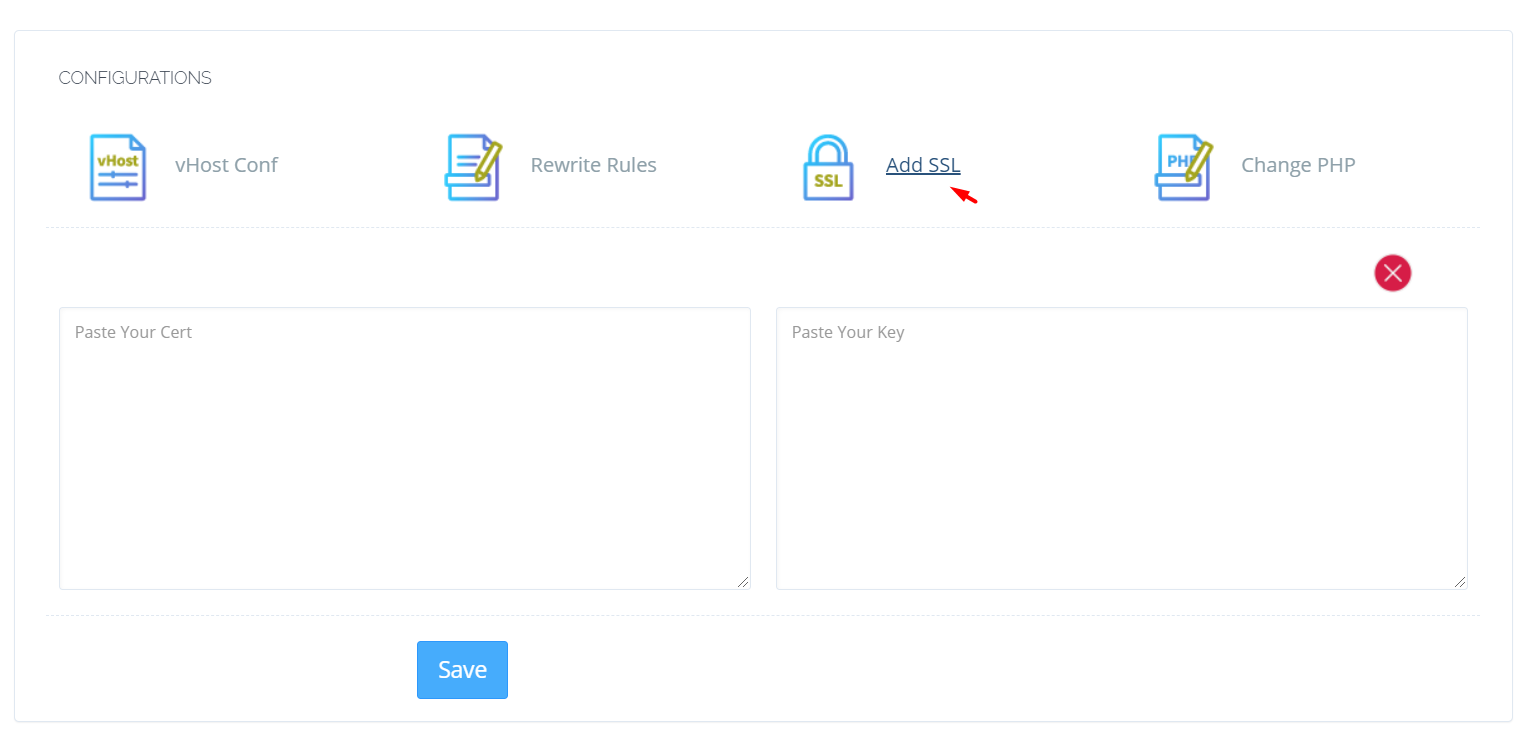
Next, you will need to manually upload a custom/self-signed certificate. Go back to HOME > WEBSITES, and click the LIST WEBSITE button. The control panel now lists all of the websites that you have created. Find the one you just made and click the Manage button to access the site management page. Click the Add SSL button, paste your Cert & Key each into the appropriate box, and press the Save button.
Step 4 - Creating a WordPress Application
Navigate back to Home > WEBSITES, and click the LIST WEBSITE button.
Find the site you just created and click the Manage button to access to the management page.
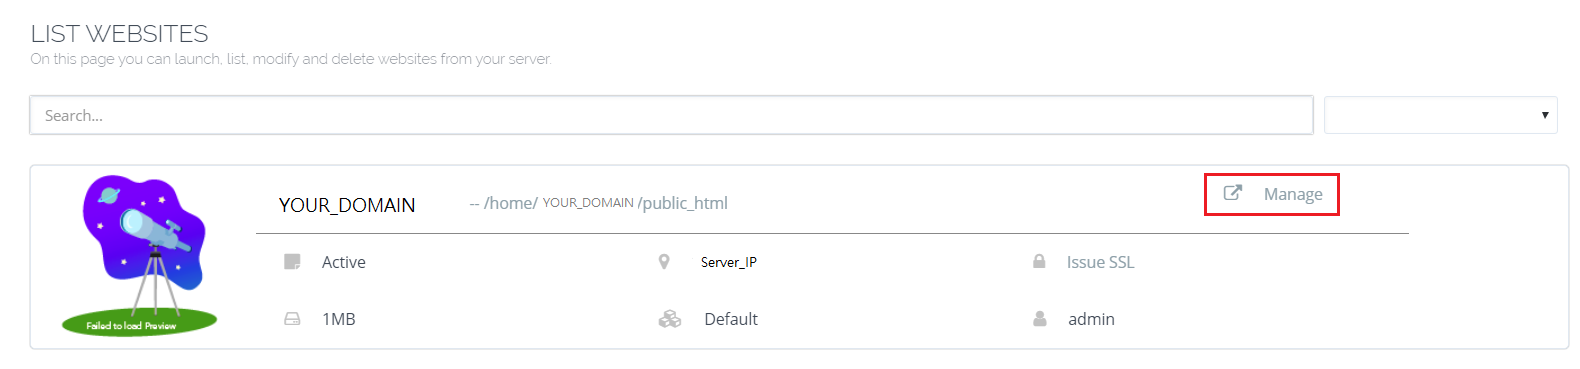
Note: If you see an image of a telescope with the words “Failed to Load Preview,” you may ignore it, as this is expected while the site is still in development.
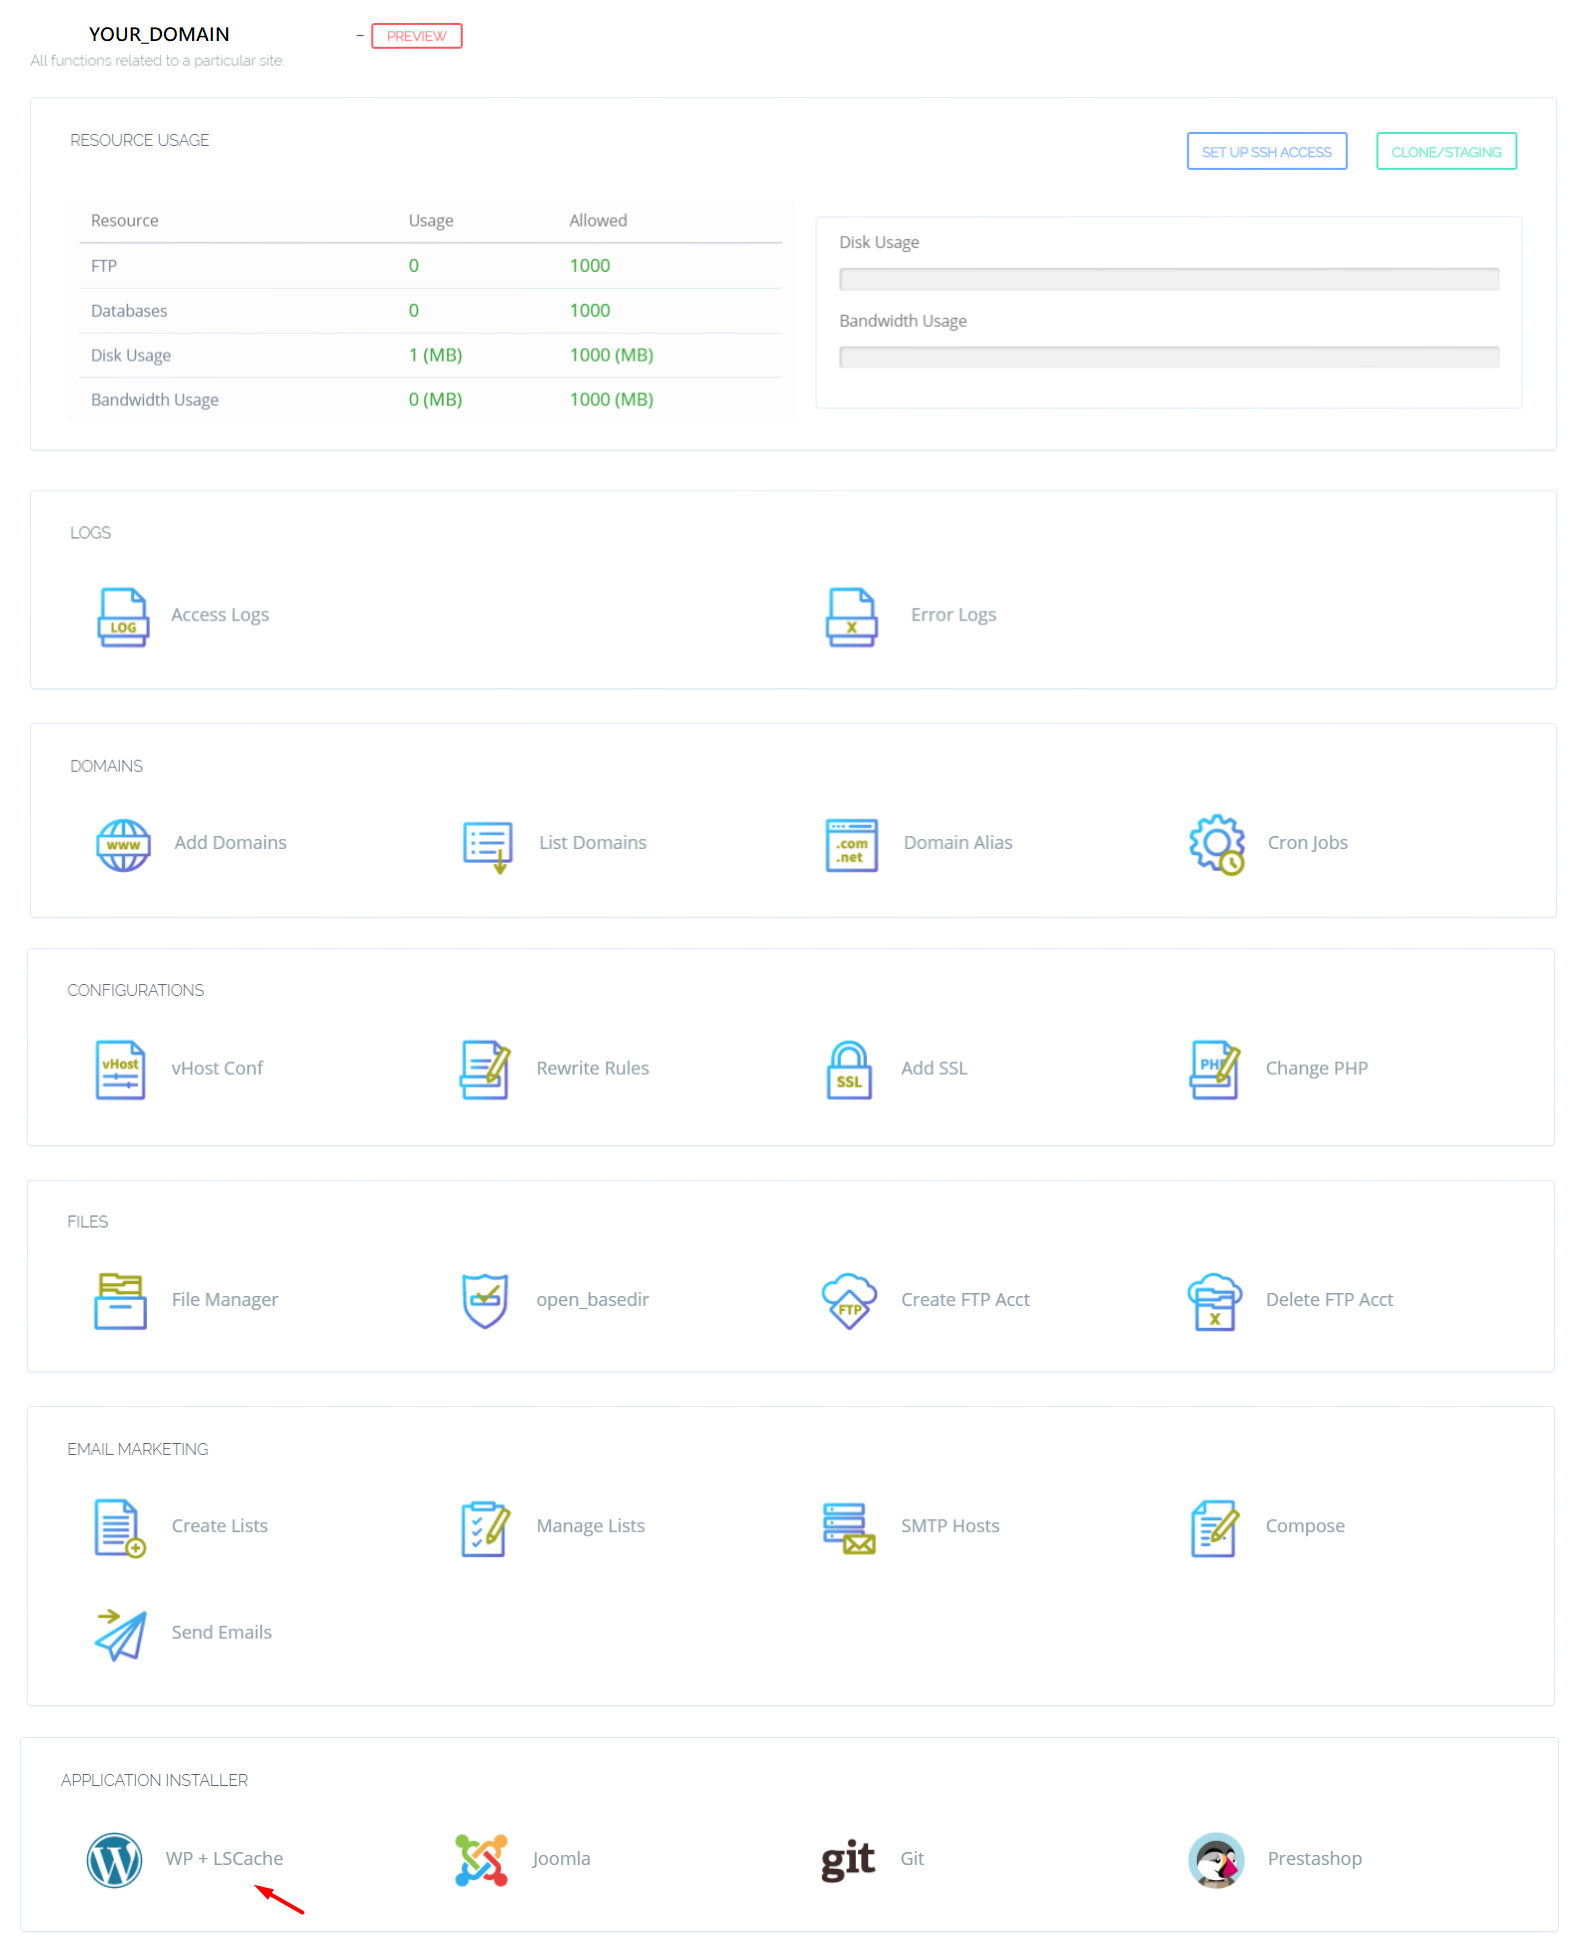
Scroll down the page to find the Application Installer section. Click the WP + LSCache button to install the WordPress application and the LiteSpeed Cache plugin together.
Input values similar to the following, and then let the control panel handle setting up everything, including WordPress itself, the database, and the plugin:
- Blog Title: My Blog
- Login User: demouser
- Login Password: YOUR_PASSWORD
- Email: demo@gmail.com
- Path: Leave empty to install under the home directory. Adding a folder name will install under /home/folder.
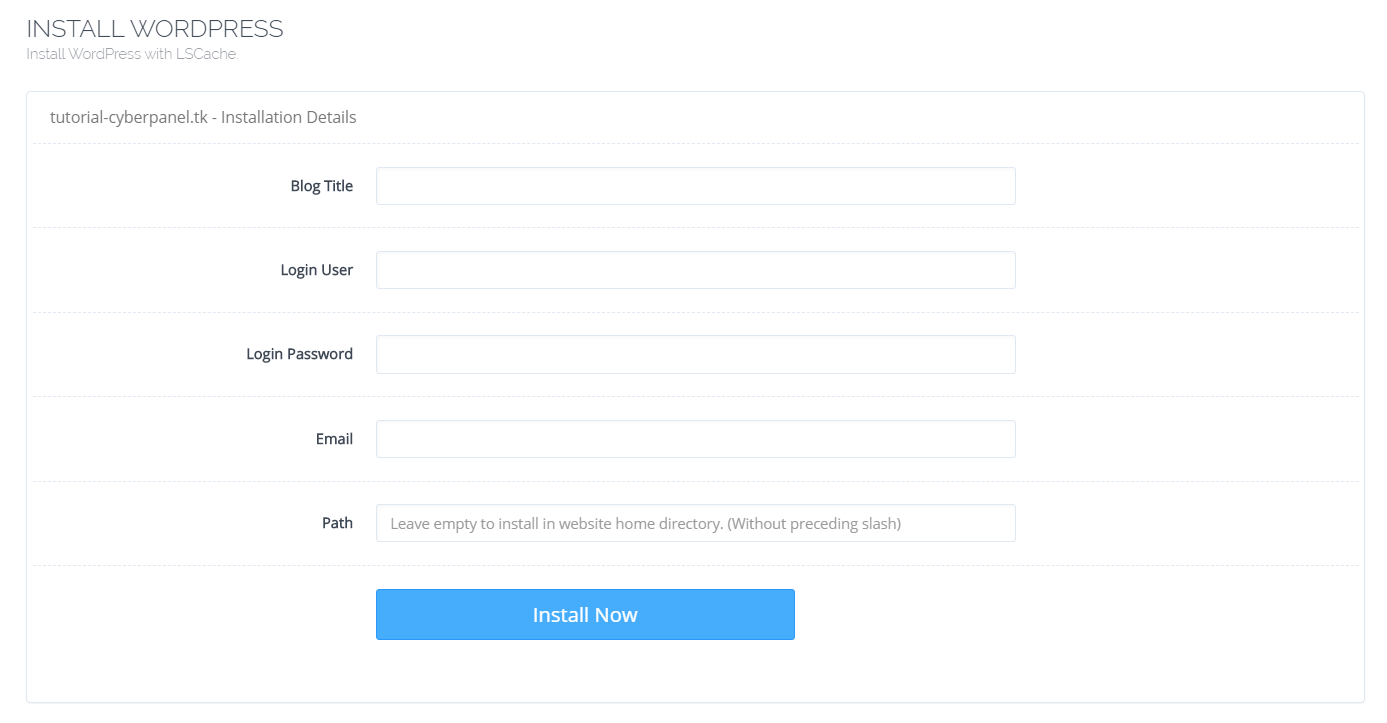
Note: It’s considered good security practice not to use a common username like “admin” for the administrative account, as many security exploits rely on standard usernames and passwords. Choose a unique username and a strong password for your main account to help keep your site secure.
Click the Install Now button to finish the installation. The server will grab the latest WordPress version to install and will automatically set up a database for you.
Step 5 - Enjoying Your Performance Site
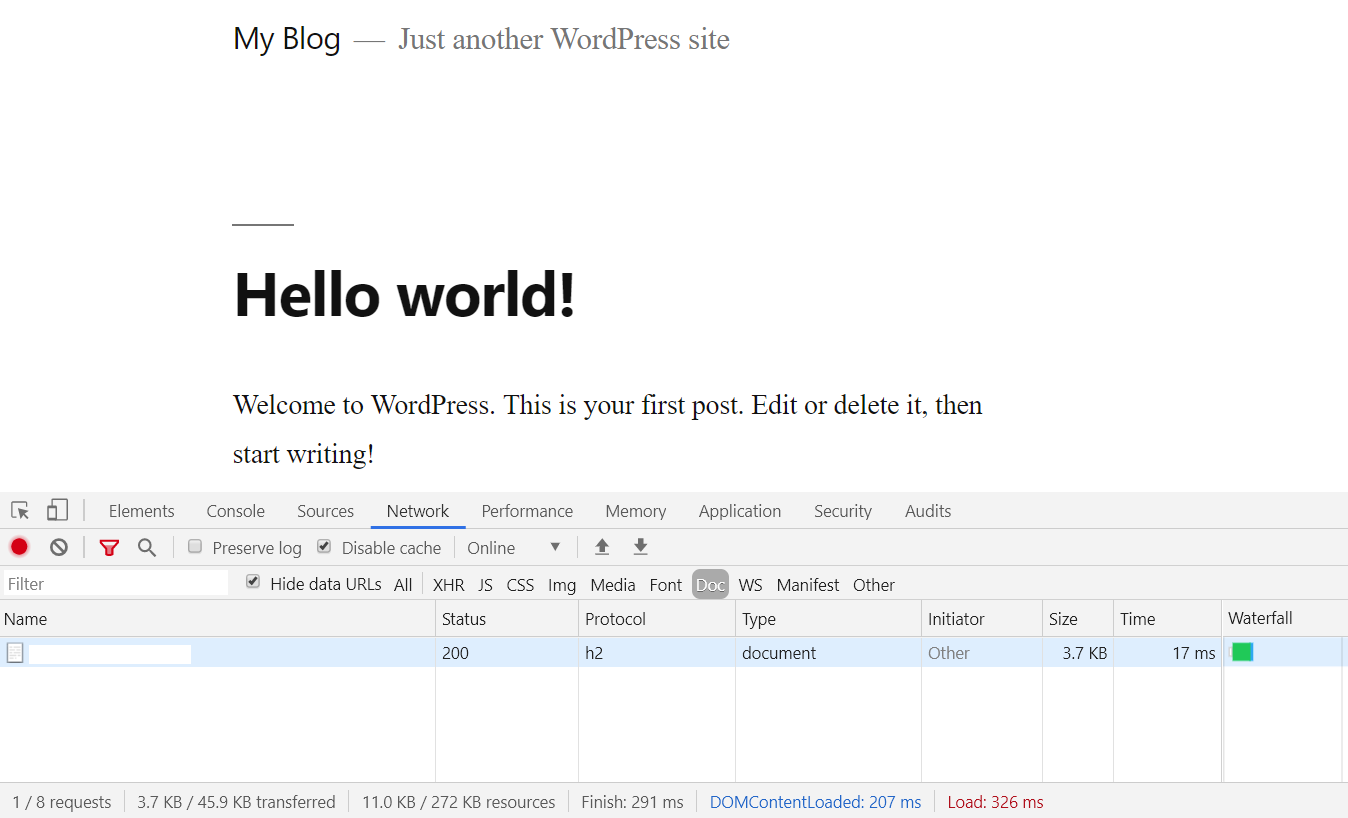
Visit your site using HTTPS: https://example.com
To check how fast your page loads from your device, you can use the Chrome browser developer tool. Press Control+Shift+J or F12 (Windows) or press Command+Option+J (Mac). An Inspect window will appear. Click the Network tab, then choose the Doc tab. Refresh the page, and you can see how quickly it loads.
WordPress installation is now complete, and you may customize your site as you desire.
To access your site’s admin, you would visit https://example.com/wp-admin/
Log in with:
- Username: demouser
- Password: YOUR_PASSWORD
By default, only the LSCache plugin has been installed via the CyberPanel app installer
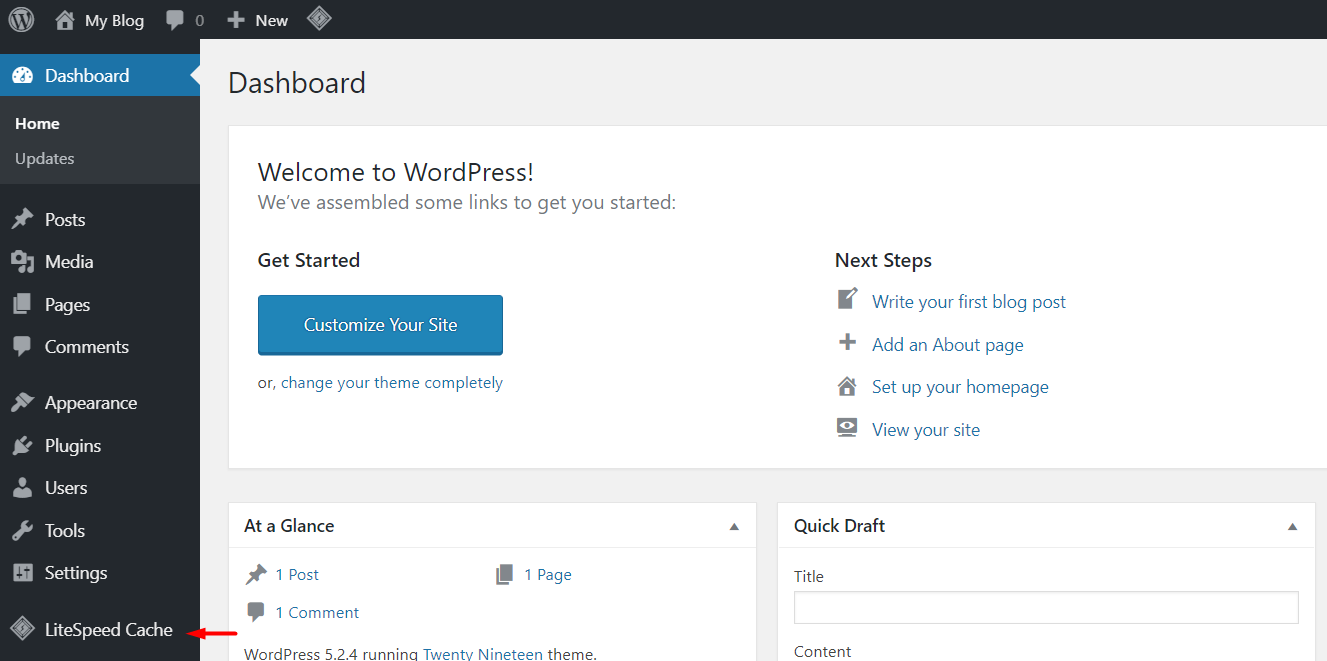
Note: We strongly recommand that you do not remove the LSCache Plugin. It is designed to work with the web server to dramatically speed up your site. In addition to page caching, it supports many optimization features like Image Optimization, Critical CSS Generation, CSS/Javascript/HTML Minification, HTTP/2 Push, Browser Cache and more. These are all things that will improve your page score.
Conclusion
You now have a secure WordPress site, served with OpenLiteSpeed web server, using the LSCache plugin. CyberPanel will automatically handle the SSL certificate renewal from Let’s Encrypt. To learn more about CyberPanel’s advanced functions, take a look at CyberPanel’s official documentation.
Now that you’ve set up one performance site, you can easily create more WordPress websites on your own. CyberPanel comes with a user-friendly WebAdmin GUI. You should spend some time exploring the features, options and settings. Enjoy!
Leave a comment